Charring is a culinary superpower. While the untrained eye might see a kitchen mistake, experts recognize charring techniques as the key to unlocking “black gold”—a complex profile of umami, sweetness, and smoke. From professional kitchens to backyard pits, controlled carbonization separates the amateur from the master.
In this guide, you will learn the science behind the sear and the specific methods required to achieve restaurant-quality results in any kitchen.
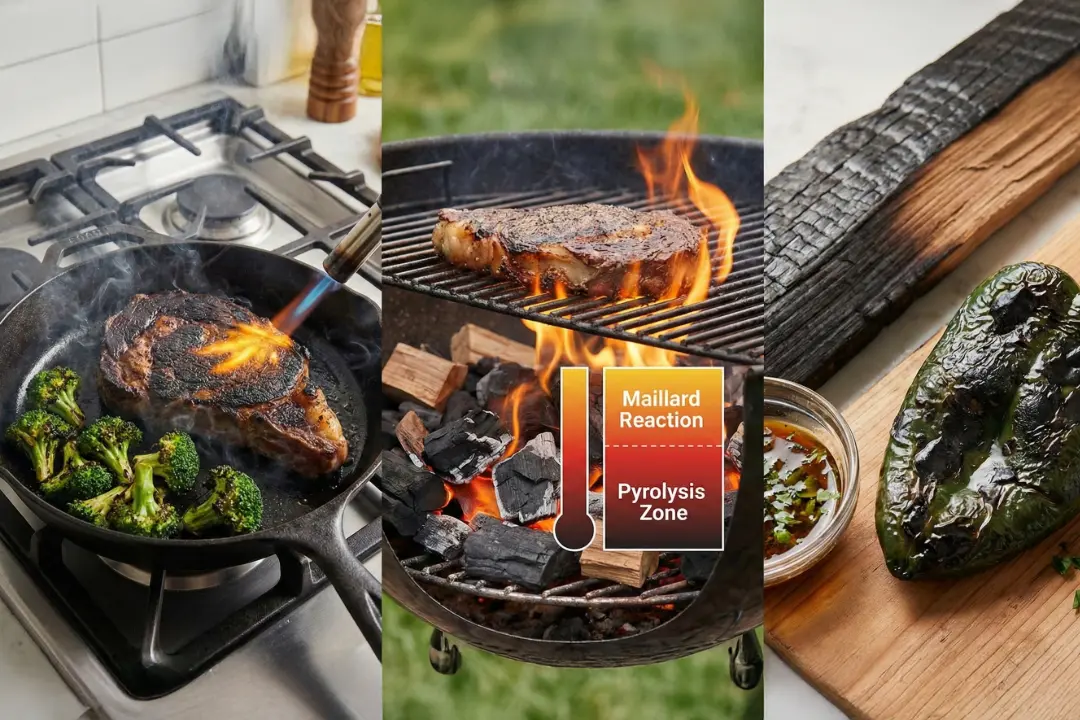
1. The Chemistry of Crust: Maillard Reaction vs. Pyrolysis
To master the flame, you must first master the chemistry. A perfect sear exists at the intersection of two critical chemical transitions.
The Maillard Reaction: Your Flavor Foundation
The Maillard reaction begins when heat triggers a transformation between amino acids and reducing sugars. Occurring between 140°C and 165°C, this process produces the savory, mahogany-brown crust that defines a world-class steak. For more on maximizing this effect, check out our guide to professional meat preparation.
Pyrolysis: Reaching the Char Point
When surface temperatures exceed 190°C, you enter the zone of pyrolysis. This is where organic compounds decompose into solid carbon.
- The Sweet Spot: Controlled pyrolysis adds a bitter-sweet smokiness that cuts through heavy fats.
- The 10% Rule: Aim for a 10:90 ratio—10% deep black char to 90% rich Maillard brown.
2. Indoor Mastery: How to Char Without a Grill
You don’t need an open flame to achieve deep flavor. Modern indoor tools, when used with precision, can mimic the high-intensity heat of a professional forge.
Why Cast Iron is Non-Negotiable
For the best indoor sear, use a pre-seasoned cast-iron skillet. Its massive thermal density ensures the surface temperature doesn’t plummet when you add cold food.
- The Dry Sear: For cruciferous vegetables, skip the oil initially. A dry pan allows natural sugars to carbonize directly against the metal.
- Active Heat Management: Rotate your ingredients frequently to ensure even contact. See our skillet maintenance tips to keep your gear in top shape.
Leveraging Your Oven’s Broiler
Think of your broiler as an “inverted grill.” By placing food 3–4 inches from the top heating element, you utilize infrared radiation to blister skins and caramelize proteins in seconds. This is the ideal method for our Mushroom Birria recipe.
3. The Great Outdoors: Fire, Coal, and Wood
Live fire adds a chemical complexity that electricity cannot replicate. The fuel you choose dictates the final flavor profile of your char.
Direct vs. Indirect Heat Zones
Successful outdoor cooking requires two zones. Use Direct Heat for the initial flash char and Indirect Heat to allow the center to reach the perfect temperature. This “Reverse Sear” method is a staple in Texas-style BBQ techniques.
The “Caveman” Sear
For an unmatched mineral-heavy crust, chefs often use the “Dirty Sear”—placing meat directly onto white-hot lump charcoal. This creates an even, intense carbonization that a grill grate simply cannot match.
| Wood Fuel | Profile | Best Pairings |
| Hickory | Pungent, Smoky | Beef, Pork |
| Apple | Fruity, Mild | Poultry, Modern Mexican Recipes |
| Oak | Balanced, Clean | Lamb, Brisket |
4. Vegetable Charring: Turning Bitter into Sweet
Vegetables like broccoli and peppers contain complex polysaccharides that transform into sweet, nutty compounds under high heat.
- Tatemado Technique: This traditional Mexican method involves roasting ingredients on a Comal until blistered and black—the secret to any authentic salsa.
- Cruciferous Crunch: Charring Brussels sprouts eliminates the “cabbage” smell, replacing it with a popcorn-like nuttiness.
5. Health & Safety: The “Clean Char” Protocol
Research from the National Cancer Institute suggests that high-heat cooking can produce HCAs. However, you can mitigate these risks easily:
- The Antioxidant Shield: Marinating meat in acidic bases (citrus/vinegar) with herbs like rosemary can reduce HCA formation by up to 90%.
- Smoke Point Precision: Always use high-smoke-point oils like Avocado or Grapeseed oil. Check our kitchen safety checklist for more tips.
Frequently Asked Questions (FAQs)
Q: Can I achieve a good char on a non-stick pan?
A: It is not recommended. Most non-stick coatings (PTFE) degrade and release toxic fumes at the temperatures required for charring (above 260°C). Use cast iron or stainless steel instead.
Q: Should I salt my meat before or after charring?
A: Always salt at least 45 minutes before or immediately before the meat hits the pan. Salting early allows the moisture to reabsorb, leading to a betterMaillard reaction.
Q: What is the best way to char peppers indoors?
A: Use a gas stove flame and metal tongs to hold the pepper directly in the fire, or place them under a broiler until the skin is 80% blackened.
Q: Does charring destroy nutrients in vegetables?
A: Some heat-sensitive vitamins (like Vitamin C) may decrease, but charring often increases the bioavailability of antioxidants like Lycopene by breaking down tough cell walls.
Take Control of the Flame
Mastering charring techniques is about finding the balance between raw and ruined. By using thermal mass, managing your heat zones, and utilizing protective marinades, you can elevate simple ingredients into extraordinary meals.
Ready to upgrade your culinary game? Start tonight by dry-charring a batch of seasoned vegetables in your hottest skillet. Taste the difference that a little “controlled fire” can make.
Did this guide help you master the sear? Share your results in the comments below!